Friday, September 27, 2013

Xyron and DCWV: Balloon Door Sign Tutorial

I started scrapbooking when my daughter was still teeny tiny and my first patterned papers were all from DCWV.  I had purchased a DCWV Nana's Nursery Baby Girl Stack Pack that I have since used every single last piece for scrapbook pages, baby cards, and baby shower decorations.  There is just SO MUCH paper in those stacks!  Fast forward three years later, and I am now creating with a DCWV Baby Boy Stack for my son!


The DCWV Baby Boy Stack is fantastic!  The paper is super thick and about half of the paper is treated with gloss or foil.  As my daughter said while flipping through it, "Mama, this paper is sooo beautiful."  Smart girl.  :)

I was especially inspired by this sheet in the stack with the hot air balloons.


So I set out to make a door sign for my son creating a large die cut hot air balloon mounted on this beautiful patterned paper.  And with some help from my awesome Xyron adhesive products and machines, it was super simple and easy!

HOT AIR BALLOON DOOR SIGN - A Project Tutorial Featuring Xyron and DCWV.


1.  Create Hot Air Balloon Die Cut.  Using an electronic die cutting machine, cut out the different pieces of the hot air balloon.  I sized the balloon to as large as possible on a 12" x 12" mat.  I used my Silhouette Cameo and a cut file from Lettering Delights - Balloon Craze.  


Then, apply adhesive to the die cut pieces, except for the large base piece, using the Xyron Creatopia (Permanent Adhesive).  This is one of my favorite ways to use my Xyron!


With the die cut pieces still on the plastic backing from the Xyron Creatopia, add some color to the patterned paper using some ink.  I used premium dye ink from ColorBox - My Favorite Things (Orange Fizz) and applied it onto the paper using a little sponge dauber.


Finally, assemble the die cut pieces together.  Because of the Xyron Creatopia, this step is super fast and easy - just like putting stickers in a notebook.


2.  Create a Banner.  I wanted to create a banner strung across the balloon and especially loved this "baby" banner in one of the patterned papers included in the DCWV Baby Boy Stack.


There are two sheets of each patterned paper in the stack pack.  Using scissors, cut out each of the letter pennants (leaving you with two sets of pennants, each spelling "baby").  Fussy cut one set of pennants minus the white and stitched color outline.  Adhere that directly on top of the other set of pennants using DIY Foam Tape.  from one set of letter pennants and them on top of the letter pennant using DIY Foam Tape.


To create the name banner, use chipboard banner shapes and simply cover them with patterned paper.  I used banner shapes from Basically Bare.  (Xyron did a blog hop with Basically Bare last December which you can find here.)


Cover the pennant pieces with DCWV patterned paper.  I traced the pennant shapes onto the patterned paper, cut them out, adhered adhesive onto the paper using my Xyron 1.5" Create-a-Sticker, and then sanded the edges using a Core'dinations sanding block.  


Then, embellish the pennants.  I used American Crafts Thickers in different fonts to spell out my son's name.  Then adhere the pennants directly onto the hot air balloon die cut and embellish with twine.  

3.  Reinforce the Background Patterned Paper.  Since this project is intended to hang on a door (and not sit flat inside a page protector, reinforce the background patterned paper by adhering it onto some cardboard.  I used the back cardboard piece of the DCWV Stack and applied adhesive using the Xyron Creatopia.  (Gotta use the ENTIRE stack, right?!)  Then punch two holes along the top edge of the paper to string some ribbon through for hanging.


NOTE: The little embellishment along the bottom of the patterned paper is just a photo of my son inside a polaroid die cut using a Lawn Fawn - Lawn Cuts craft die that coordinates with the "say cheese" stamp set.  Along the bottom of the polaroid is a little banner die cut from the DCWV patterned paper (the same sheet that also included the "Baby" banner shown in step 2 above).

4.  Adhere the Hot Air Balloon Die Cut, Attach the Banner, and String the Ribbon.  I then mounted the hot air balloon die cut (embellished with the banner) using DIY Foam Tape.  By making my own foam tape, I can cut whatever size foam squares that I need.  For this one, since the balloon was so large at the top, my foam squares were HUGE; it made everything so much faster!  Then string through some ribbon and your wall hanging is ready to display!


Make sure you see some other awesome projects featuring DCWV and Xyron on the Xyron Facebook Page!

As always, thanks for stopping by!

Tuesday, September 17, 2013

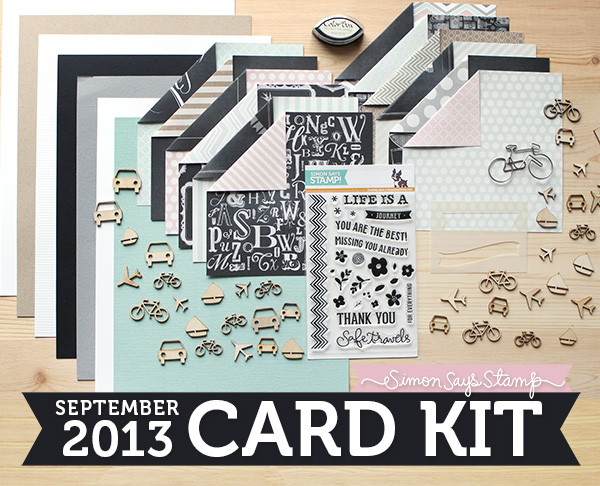
Simon Says Stamp Card Kit - September 2013

I finally got to play with my September Card Kit from Simon Says Stamp and made a TON of greeting cards.  


I also used over and over and over these awesome new Stitched Mats - Rectangle Dies from Lil' Inker Designs.  


I am seriously in love with these dies which make card making so super fast and easy now!

1.  You Are my Sunshine Card.  


Supplies:  Simon Says Stamp September Card Kit, Lil' Inker Designs Stitched Mats - Rectangles, Xyron Mega Runner, My Favorite Thinks Premium Dye Ink Pads.

2.  Hello Card.  This might be my favorite card in the bunch.  How awesome is all that die cut stitching?!?!


Supplies:  Simon Says Stamp September Card Kit, Flair from Simon Says Stamp August Card Kit, Lil' Inker Designs Stitched Mats - Rectangles and Circles, DIY Foam TapeXyron Mega Runner, My Favorite Thinks Premium Dye Ink Pads, WRMK Journaling Cards.

3.  Safe Travels Card.  


Supplies:  Simon Says Stamp September Card Kit, Lil' Inker Designs Stitched Mats - Rectangles, DIY Foam TapeXyron Mega Runner, Lawn Fawn Stamps.

4.  Floral Banner Cards.  I love using the stamp set in the card kit to make my own floral designs. So fun and they pair perfectly with one of the banner sentiments!


Supplies:  Simon Says Stamp September Card Kit, Lil' Inker Designs Stitched Mats - Rectangles, DIY Foam TapeXyron Mega Runner, My Favorite Thinks Premium Dye Ink Pads.

5.  Happy Birthday Card.


Supplies:  Simon Says Stamp September Card Kit, Lil' Inker Designs Stitched Mats - Rectangles, Xyron Mega Runner, My Favorite Thinks Premium Dye Ink Pads, Papertrey Ink Stamps.

6.  Thank You Card.  


Supplies:  Simon Says Stamp September Card Kit, Lil' Inker Designs Stitched Mats - Rectangles, DIY Foam Tape, Xyron Mega Runner.

And I still have more cardstock to play with!!!  This month's kit was definitely a home run!  

As always, thanks for stopping by!

Friday, September 6, 2013

Party Themes: A Tutorial on How to Make a Party Banner

After helping family and friends decorate so many parties over the years, I've created a recipe for a party banner that really works for me and the aesthetic that I enjoy.  This recipe also highlights some of my favorite techniques using my Xyron adhesive machines.  For this tutorial, I will be using this Happy Birthday Banner as my sample.


Supplies:  Xyron 5" Creative Station (Permanent Adhesive), Xyron Creatopia (Shapez Component), Patterned Paper and Stickers (Echo Park - Splash); Cardstock (American Crafts, Recollections, Neena Paper); Digital Elements (Echo Park - Splash Alpha); Sizzix Framelits - Banners, Pennant Scallop and Banners, Pennant Plain; Martha Stewart Crafts Edger Punch - Threader; Ribbon (American Crafts); Silhouette Cameo with Designer Studio Software.

1.  Choose the Papers for the Banner Pennants.  I like to use two layers of paper for my banner pennants.  The bottom layer is usually scalloped and the top layer a plain version of the same shape.  For this whale themed birthday party banner, I used patterned paper from Echo Park - Splash and white cardstock from my scrap stash (a combination of American Crafts, Recollections, and Neena Paper). 

2.  Cut Out the Banner Pennants.  There are a number of options on how too cut out banner pennant shapes.  For this banner, I used steel dies (Sizzix Framelits - Banners, Pennant Scallop and Banners, Pennant Plain) and my Xyron Creatopia (Shapez Component).


TIP:  My other favorite way to cut pennants is with an electronic die cutting machine.  If you're using the Cricut, I absolutely adore the options available on the Birthday Bash Cricut Cartridge.  I still own my Cricut just for those banner pennants.  If you have a Silhouette, there are a TON of options in the Silhouette Online Store. 

3.  Adhere Plain Pennants to the Scallop Pennants.  Before I owned a Xyron machine, I would use a glue stick or small tape runner to adhere my pennant layers together.  WHAT A PAIN!!  And if I used a tape runner instead of a glue stick, the edges of my top layer would always catch on something and eventually rip off.  Enter Xyron.  Edge to edge adhesive that literally takes no time.  I used my Xyron 5" Creative Station (Permanent Adhesive) to quickly add adhesive to my white plain pennant shapes.  LOVE THIS TECHNIQUE!


And in no time at all, I had a beautiful pile of pennants.  To make the holes for the ribbon, I used the Martha Stewart Crafts Edger Punch - Threader.  Obviously a normal hole punch would work too.  :)


4.  Create Banner Sentiment.  For the banner sentiment, I place one letter on each pennant with an image on a pennant between words.  I usually just use my Silhouette Cameo or Cricut to cut letters large enough to cover 3/4 of the pennant shape.  However, I wanted my letters to match the alpha set used in the Echo Park - Splash collection (which I used in the banner pennants and throughout the entire party).  Enter digital scrapbooking files!!!

Echo Park sells almost all of their paper collections in a digital format at Jessica Sprague.  So with the Echo Park - Splash Alpha downloaded onto my computer, I dragged the letters (PNG files) into the Silhouette Studio Software, resized it, traced them, offset the original images, made sure that the cut lines were there, and then print and cut each letter with a nice white border around it.


5.  Adhere Letters to Banner Pennants.  To quickly create dimension, I just adhere all of my letters onto the banner pennants with foam tape.  This is my second favorite technique using my Xyron machine.  MAKE YOUR OWN FOAM TAPE!!!!  If you only use your Xyron to make DIY foam tape, it is worth it's weight in gold!  


6.  Embellish.  You can be as simple or fancy as you want.  For this banner, I simply added DIY Foam Tape to the back of some stickers that came in the collection pack with my patterned paper and adhered them onto the pennants between the words in the sentiment.  


TIP:  Sometimes, I will scatter flowers or rosettes or other small embellishments throughout the different banner,  

7.  String it Up!  I used to tie each pennant together using lots of ribbon like this one here.   But over the years, I found that it took way too much time and that effort, to me at least, was not worth it.  Instead, I simply string either ribbon or twine through the pennant holes and call it a day.  That way, I can also move the individual pennants as needed.  And even this step still takes me forever (especially when my ribbon is the twice the size as my hole)!


Well I hope that helped give you a basic guideline on how to make your own banner.  I've included some images below of other banners I've made and posted on the blog.  

Thanksgiving Banner.


Snowflake Banner:


 Easter Birthday Banner:


Family Banner:


Fourth of July Banner:


Blueberries for Sal Birthday Banner:


Sweet Pea Baby Shower Banner:


As always, thanks so much for stopping by!!
Related Posts Plugin for WordPress, Blogger...