Wednesday, June 26, 2013

Xyron and Little Yellow Bicycle and May Arts Blog Hop


There is an awesome blog hop happening all week with Xyron, Little Yellow Bicycle (LYB) and May Arts Ribbon.  The box I got to play with was filled with so much awesomeness from the LYB Poppy and Naturals line and some seriously gorgeous ribbon from May Arts.  Can someone say inspiring?!?!?

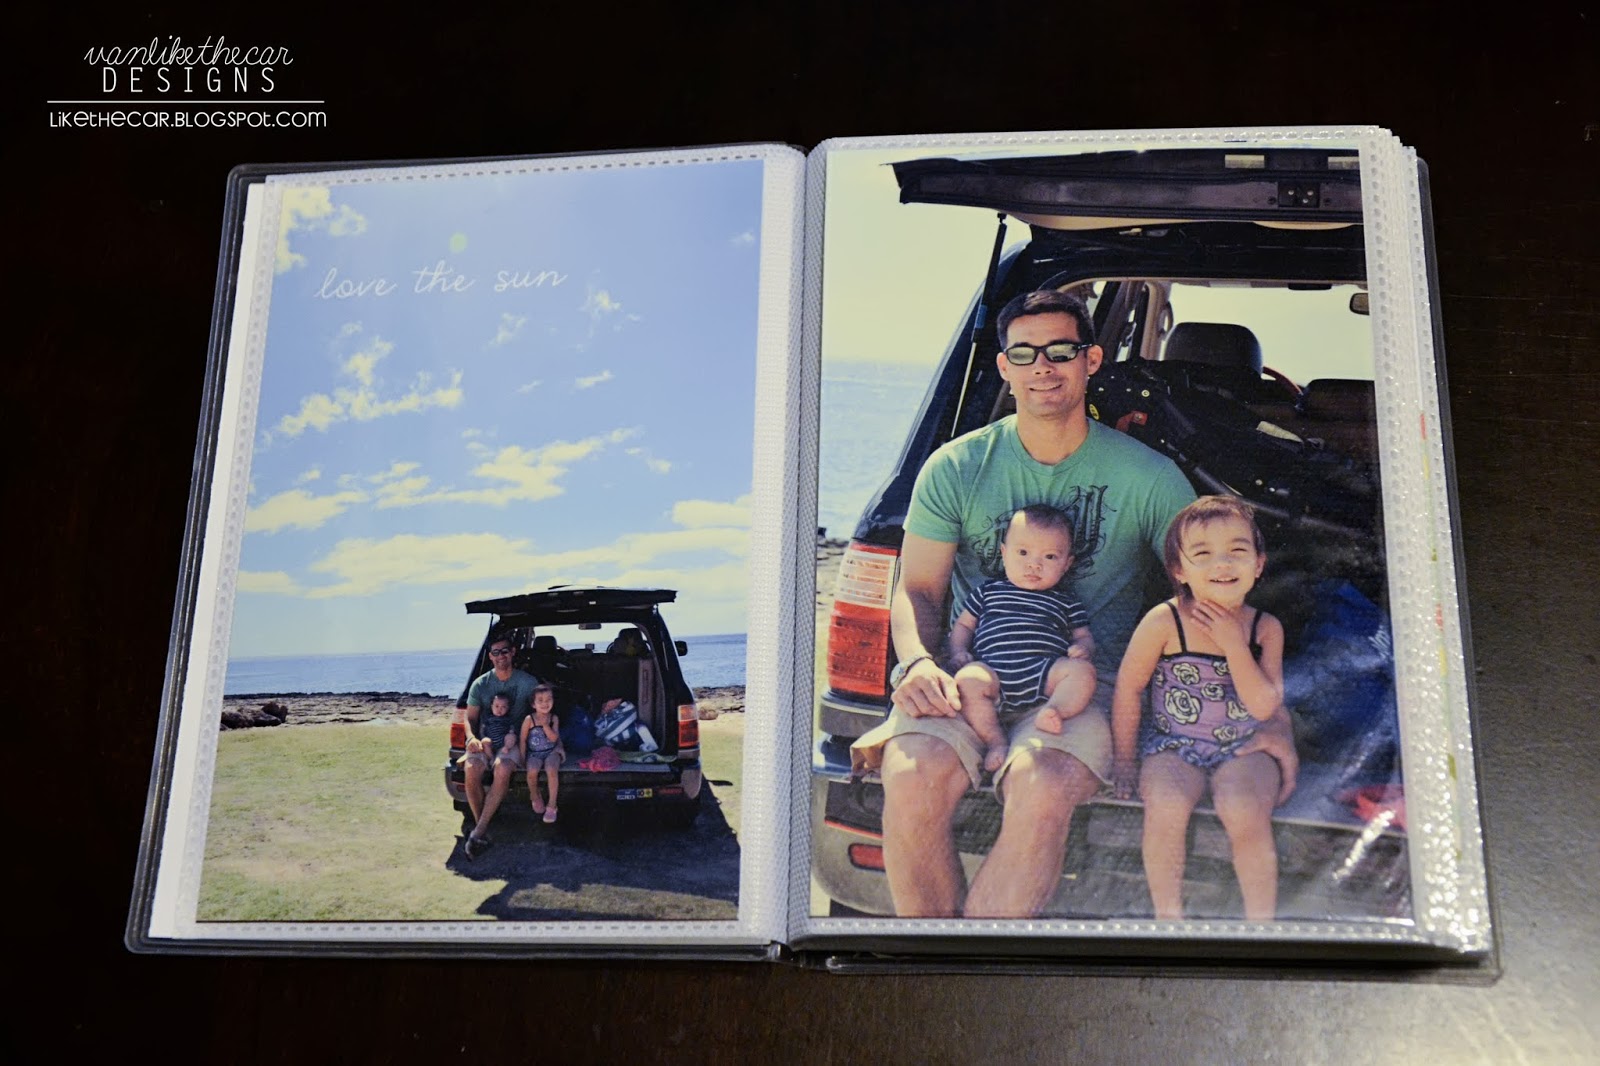
1.  Daughters Layout.  This first layout was 100% inspired by the papers and images in the brand new LYB Poppy Collection.  I wanted my layout to look like a field filled with poppies and used the gorgeous LYB papers and my Silhouette Cameo to cut this poppy cut file multiple times and in different sizes.


Supplies:  Adhesives (Xyron Mega Runner, Xyron Tape Runner, Xyron 1.5" Create-Sticker, DIY Foam Tape); Little Yellow Bicycle (Patterned Paper, Journaling Cards, Stick Pins, Vellum Tape); Cardstock (American Crafts); Letter Stickers (American Crafts, October Afternoon); Ink (Tim Holtz Distress Ink, Stickles, Memento, Stazon); Digital Cut File (Sweet Elise); Stamps (Office Max, American Crafts - Amy Tangerine); Tim Holtz Tiny Attacher.

I loved using the LYB Journaling Cards and Vellum Tape (which is my new obsession btw!) to create a simple photo cluster at the top of the layout.


And while it took a long to cut all of the flower pieces and to assemble them, I love how dimensional the poppy garden looks!


Crafting Tip:  When assembling cut outs that include small intricate pieces (like the yellow and black flower centers), use the Xyron 1.5" Create-a-Sticker to easily and quickly add adhesive to the tiny pieces.

2.  Seed Packet Gift.  Since the Poppy Collection has a spring and garden theme, it worked really well for this little gift packaging I made for some seed packets. The LYB Journaling Cards include a few adorable tag shapes that are the perfect base for layering stickers and sentiments.  The May Arts Ribbon also provided the perfect finishing touch.


Supplies:  Adhesives (NEW Xyron Double Sided Tape, DIY Foam Tape); Little Yellow Bicycle (Patterned Paper, Journaling Cards, Cardstock Stickers, Cardstock Word Stickers); Ribbon (May Arts); Digital Cut File (Lori Whitlock).

Crafting Tip:  When assembling projects that are either three dimensional or that will get handled more (like the bag in the project above), use the NEW Xyron Double Sided Tape to adhere the project together.  This is similar to the red liner tape but easily rips off with just your fingers.  It truly is a must have in every craft room!

3.  Hair Clip Card.  May Arts Ribbon is deliciously beautiful.  It comes it all shapes and sizes and colors and textures.  When I see beautiful ribbon, I instantly want to roll it up into a flower and add it to a clip for my daughter.  And one of my favorite go to quick and easy gifts is a card with the hair clip actually integrated into the design.


Supplies:  Adhesives (Xyron Mega RunnerDIY Foam Tape, NEW Xyron Double Sided Tape); Little Yellow Bicycle (Patterned Paper, Journaling Cards, Cardstock Stickers, Cardstock Word Stickers, Burlap Flowers); Cardstock (Neena Paper); Ribbon (May Arts), Embossing Folder (Lifestyle Crafts).

And here is a picture of the hair clip removed from the card.


Crafting Tip:  Consider dissecting elements of premade embellishments to fit your needs.  For this card, I removed the leaves from the LYB Burlap Flower to use on my card.  I can use the circle and button elements for another project.  And for fabric or ribbon elements, use Xyron Double Sided Tape to make sure that it adheres securely to your project.

Be sure to visit the Xyron Blog and Xyron Facebook Page all week for more inspiration from all three of our design teams!  As always, thanks for stopping by!

Monday, June 24, 2013

Returning to Basics - A Father's Day Mini Album

I sometimes feel like my evolution as a scrapbooker mimics my evolution as a home cook.  Before I was married and with kids, I insisted (with my wanna-be Martha Stewart assertiveness) that good meals had to be made from scratch.  To make the Thanksgiving stuffing, I use homemade bread, homemade chicken stock, and even insist on using home grown herbs.  Obviously, with a husband that always seems to be gone at sea and two little ones, I'm unable (and unwilling) to go to such extremes in the kitchen.  I reach for my Stovetop Stuffing with no hesitation these days.  That same reality check applies to the craft room.

Once upon a time, I would spend hours or days on a single layout, thinking that it had to mimic those gorgeous creations I saw on the manufacture blogs or in the magazines. While I still enjoy making those mini pieces of art every once in awhile, I have realized that the heart of this hobby for me is the memory keeping.  It's putting those layouts onto a page and into my albums for my family to enjoy.  It's taking those photos off of my hard drive and into albums.  It's about making stories from the past tangible in the present. 

While this mini album I made for father's day is nothing fancy, it represents what I love about this hobby.  I love taking beautiful photos of my family.  I love using digital tools like Rad Lab and digital brushes to make these photos look cool and special.  I love using up my scrapbooking stash.  I love projects that are super simple to put together and easy to enjoy. 


To make this album, I started off with this super cheap photo album from Target.  You probably have a ton of these lying around your house.  I bought mine for around $2.

I then removed the front and back cardboard covers and replaced them with these Project Life style cards by Splendid Fiins (Hello Daddio Collection) that I printed out on my home computer.  Note: when you buy the digital kit, you get a bunch of JPEG files that you can easily print to any size you want a home.  I personally used Photoshop to resize the card files to fit my album and then printed them on glossy photo paper.


For the journaling pages inside the album, I just used the journaling cards from my Simon Says Stamp June Card Kit.  They were sized perfectly to fit the 4x6 openings and included plenty of journaling space.  And when I did spend some time embellishing the cards, I just reached for the stamp set in the card kit (from Kelly Purkey) and some other father's day themed ones that I had on hand (including Lawn Fawn Dad's Day).


For the photos in the album, I quickly edited them using Photoshop and Rad Lab.  In many of them, I also added various "digital brushes" (i.e., the word art) directly onto the photo before printing.  The brushes I used were from Splendid Fiins (Spot On Collection) and Simple Scrapper (Stories of Summer Toolkit). 


The longest part of this process was selecting the photos and editing/ printing/ cutting them.  I think if I had spent more time on the journaling cards, it might have been a bit fancier.  But I ultimately knew that it was for my husband and I just wanted him to have something to keep on the ship when he was at sea.  So keeping it quick and simple was perfect.

Here are photos from the rest of the album.  There are a lot of photos so beware...  :)


I know that it's simple but I genuinely loved this mini album.

As always, thanks so much for stopping by!!!!

Friday, June 14, 2013

Aloha Friday - Hikes and Hula Skirts


Aloha Friday, everyone!!!  Even though Justin is gone more these days, we still are able to sneak in some good ol' island fun.  I still can't believe we live in Hawaii!!!  So, as usual, here we go with mainly unedited photos and minimal commentary.  I'm sure Justin wishes he could ask for minimal commentary from me in real life.  :) 

1.  Honolulu Zoo - Military Appreciation Day.  Being from San Diego, I'm a bit of a zoo snob.  But the Honolulu Zoo is cheap and toddler friendly.  Recently, the zoo even offered free admission and a free lunch for all military members and their families.  It truly was such a nice event and the perfect way to spend an afternoon with the family.

Here's Benjamin trying some watermelon during our free lunch.


They had some acrobats performing on the lawn along with a bunch of vendor tents.


And since it was the zoo, there were some animals.  :)  Charlotte loves the giraffes!


2.  Turtle BeachSince my parents came to visit us recently, we revisited some old sites.  They're so beautiful though that it never seems to get old.  One our stop by Turtle Beach, there were a TON of turtles on the beach and in the water that morning!


3.  Makapu'u Lighthouse HikeI love this hike because you can push a jogging stroller the entire way up. 


And now it's my dad's turn to push.  :)


The views along the way and at the top of the point are also pretty spectacular.


And here I am with my mum.


4.  Paradise Cove LuauWe decided to try a different luau with my parents (we went to Germaine's with Justin's dad).  


Paradise Cove was more expensive and a more crowded.  However, there were so many activities to do before the dinner and actual show began.  There was an arts and crafts table where Charlotte made a hat and flower bracelet.


There were different games like spear throwing or bowling.  And after completing east game, Charlotte collected a little shell lei.


There were also a bunch of demonstrations like fish net throwing...
 

...coconut tree climbing...


...a short sunset hula show...


...and seeing them remove the kahlua pig from the oven.


And of course, there was the food and show. 


Charlotte just goes crazy over the luaus and is completely memorized watching the hula dances.  Good thing we have time for a few more luaus before we leave. 

5.  Bellows Air Force BeachI've heard so many people talk about Bellows and we finally made it out there over Memorial Day Weekend.  Um...wow.  I think it might be my favorite beach on the island now.


6.  Pali Lookout.  This is right off the Pali Pass and the view is incredible. 


7.  Hawaii State Fair.  So if I can be brutally honest, there isn't much going on at the Hawaii State Fair.  Charlotte loves the over priced food but it's small.  However...admission to the circus show that is included in your $3 ticket is worth EVERY.SINGLE.PENNY.  Who knew there was so much talent in a tiny little traveling circus?!  Really spectacular.


8.  Manoa Falls.  You have to pay $5 to park right at the trail head and the hike itself has some amazingly muddy spots.  Beware.  Seriously.  Like, I fell on my butt and twisted my wrist pretty badly muddy.  But it's beautiful.


9.  Teddy Bear World.  And finally, I took the kids to Teddy Bear World the other day.  Can someone say, AWESOME!!!  This place is hilarious.  Just check out the photos.  Charlotte's favorite part of the museum was the Elvis Bear show at the end!


And on that note, I think this post has gotten long enough.  For those of you that made it to the end, BRAVO!!!  As always, mahalo for stopping by!!!
Related Posts Plugin for WordPress, Blogger...